
A last-minute roll of wrapping paper can cover a stack of boxes and still leave you short on bags, tags, or a tie that actually holds.
Odd-shaped gifts wrinkle under a single sheet. Leftover paper is often too narrow for another box. A store bow can feel like the only option when the ribbon drawer is empty.
These 11 DIY Christmas gift wrapping ideas for a handmade holiday come from original tutorials, each with a different wrap, bag, tag, or tie. Below you’ll find the materials, the key method, and a link back to the full how-to. This list stays on packaging — not the gift itself, and not decorations for the house.
Start with the Wrap, Then Add the Tie
The Wrap. Kraft or leftover wrapping paper suits a box. A paper bag folded around a carton, or a sewn cloth bag, is a better choice when the shape will not take a tight fold. A bottle needs a different bag than a book does.
Use Leftovers on Purpose
The Trim. Grocery bags, scrap fabric, felt strips, tissue, and leftover buttons can become flowers, bows, bands, and tags. A leftover strip does not have to be wide enough to wrap a box in order to finish one.
Keep Heat, Blades, and Small Parts in Adult Hands
The Safety. A heat gun, melted sealing wax, a hot glue gun, an iron, pruners, and a sewing needle are adult tools. Buttons, beads, and loose cords are small parts. None of these wrapping ideas is presented as a child’s unsupervised craft, and greenery or paper flowers tied onto a package are decoration, not a snack.
Leave Room to Write the Name
The Tag. A handmade tag needs a blank back, a hole or loop that will not tear, and a tie that can be knotted onto the ribbon or twine. If the wrap is already busy, a plain kraft back makes the name easier to read.
1. Kraft Paper Packages with Greenery Trees
Tutorial: Ananda, A Piece of Rainbow
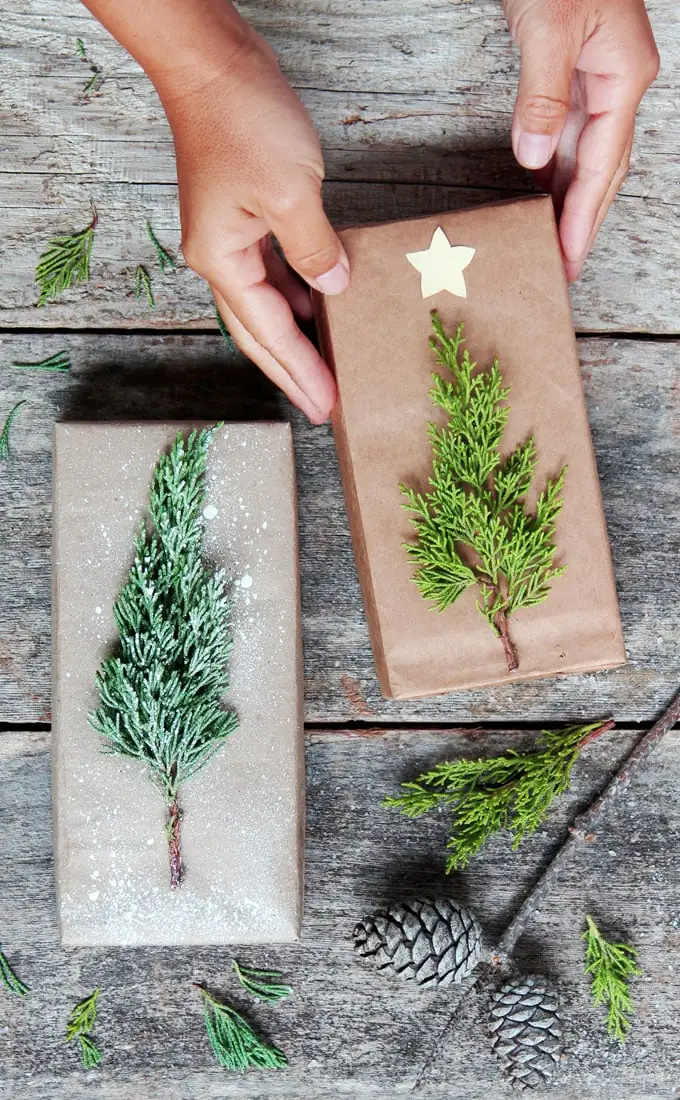
This wrap starts with plain kraft paper, then uses a clipped evergreen sprig as a flat tree on the front of the box. In Ananda’s photo, one package is dusted with white paint to look snowy; the other is left plain and finished with a small paper-cut star at the top of the sprig. The original tutorial uses hot glue to hold the cutting in place.
What you need: Kraft paper, tape, scissors, a small evergreen cutting, and hot glue to attach the sprig, plus optional white paint or a paper-cut star. The original tutorial also shows other greenery toppers, including small wreaths; the photo here is the tree-shaped sprig.
Safety note: Use pruners or scissors with care. A hot glue gun and fresh glue can burn; keep fingers clear and let the glue set before you handle the gift. Avoid plants that are poisonous or that trigger allergies — the original post names oleander and poison oak as examples to skip — and treat the clippings as decoration, not food. If you add painted “snow,” let it dry before you stack or handle the gift.
2. Gift Bags Folded from Wrapping Paper
Tutorial: Ananda, A Piece of Rainbow
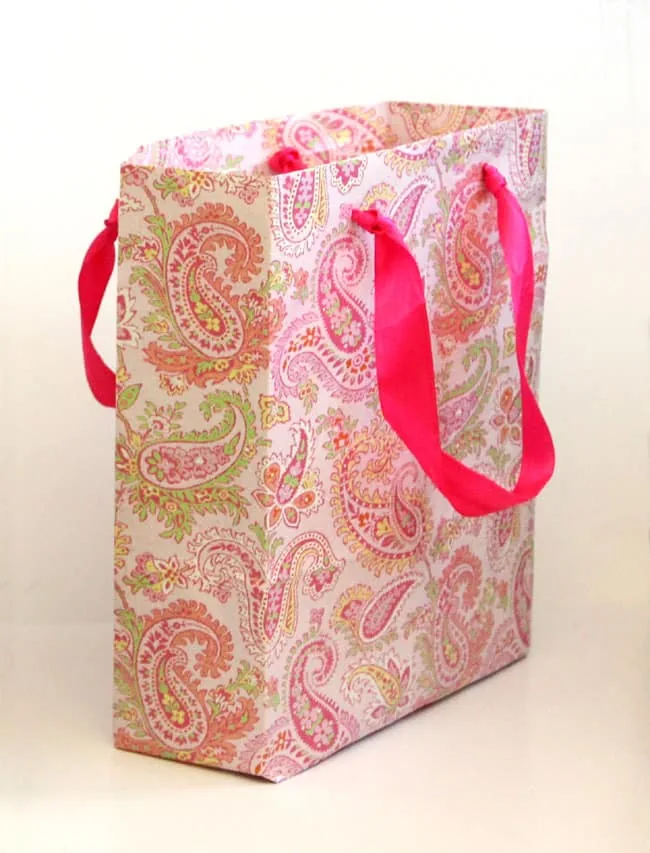
This bag is wrapping paper folded around a box used as a form, then slipped off and given handles — not a store bag and not a wrapped box left closed. Ananda’s tutorial wraps the paper around a carton or a thick book, tapes the seam and the bottom, and adds ribbon, paper rope, or fabric handles once the bag is free of the form.
What you need: Gift wrap or kraft paper long enough to wrap the form, clear tape or a glue stick, scissors, and ribbon or similar material for handles. A hole punch helps if you tie ribbon through the top edge, as in the photo.
Display tip: This is a useful DIY Christmas gift wrapping option when the gift is an awkward shape, or when a leftover sheet is too narrow to wrap a box in the usual way but wide enough to cover a smaller form.
3. Grocery-Bag Paper Flower Toppers
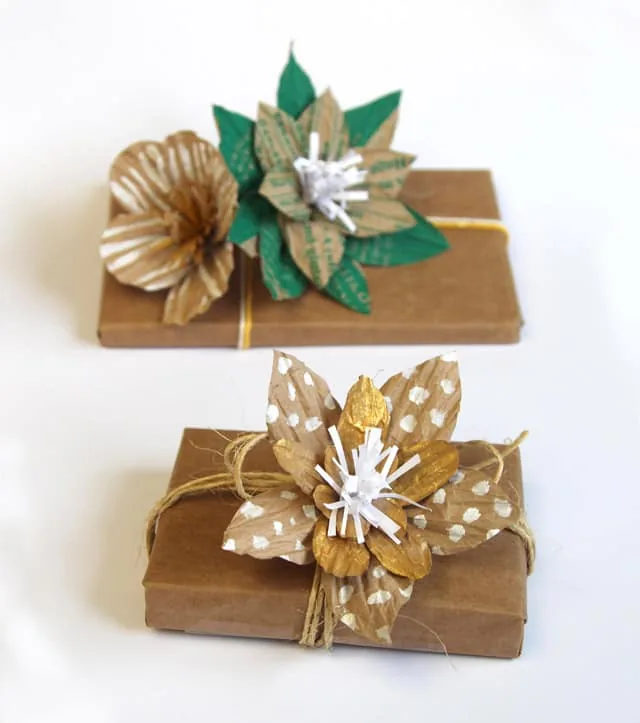
Tutorial: Ananda, A Piece of Rainbow
These toppers are layered paper flowers cut from upcycled grocery bags, then tied onto a plain brown wrap. In the photo, one flower has painted dots and a gold center; the other uses printed bag paper with green leaves. They are a constructed paper bloom, not a sprig of fresh greenery and not a felt bow.
What you need: Paper grocery bags, scissors, paint if you want a pattern, twine or thin ribbon, and a wrapped gift. A pattern for the flower shapes is on the original post; use it there, and do not copy or republish it.
Make it yours: Leave some of the bag’s original printing showing, as in the photo, so the topper still reads as an upcycled grocery bag rather than store wrapping paper.
4. Button Christmas Gift Tags
Tutorial: Crissy Baumann, First Day of Home
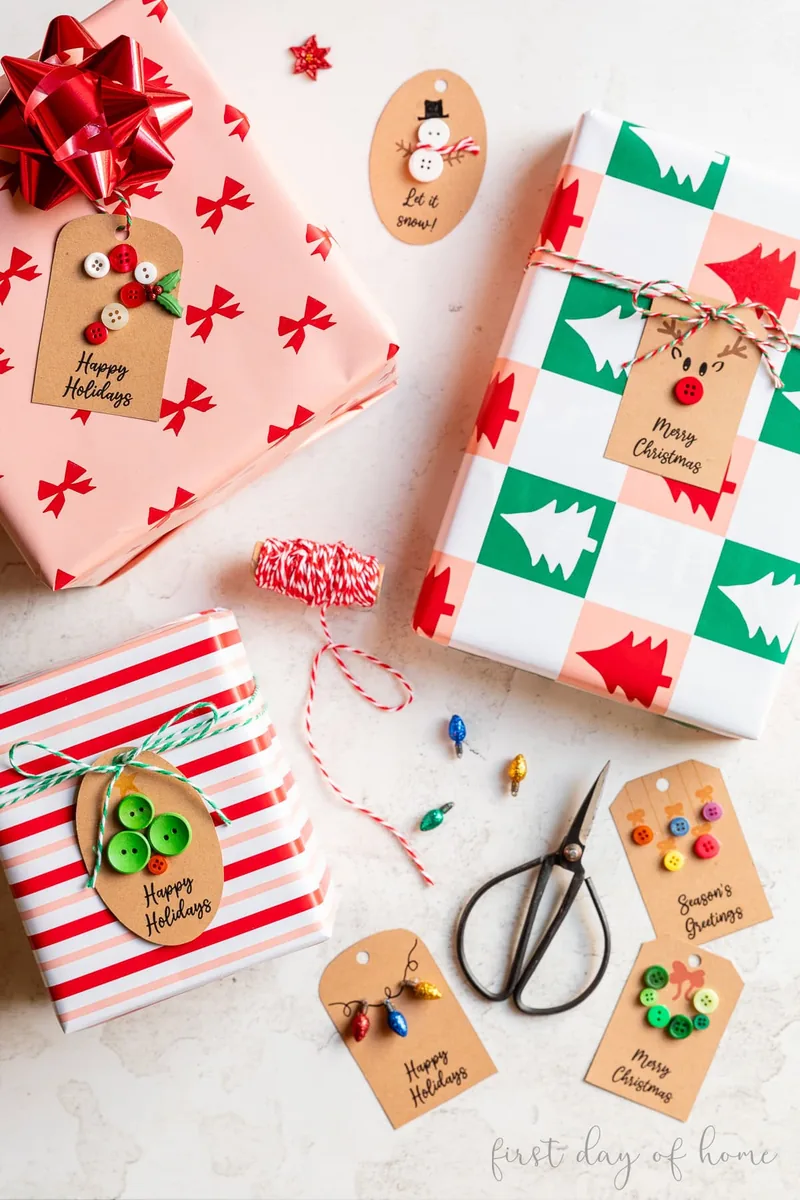
These tags start as printed or cut kraft shapes, then use buttons as simple holiday pictures — a tree, a wreath, a snowman, a reindeer — rather than as loose decoration. Crissy’s First Day of Home tutorial has you cut the tags, punch a hole, and glue the buttons in place. A free printable template is offered on the original post; use it there, and do not copy or rehost the file.
What you need: Kraft paper or cardstock, scissors, a hole punch, buttons, school glue or a hot glue gun, and baker’s twine. Paint pens or small extra embellishments are optional.
Safety note: Buttons are a choking hazard. If you use a hot glue gun, the tip and fresh glue can burn; keep fingers clear and let the glue set before you tie the tag onto a gift.
5. Wax Seals on Ribbon-Tied Packages
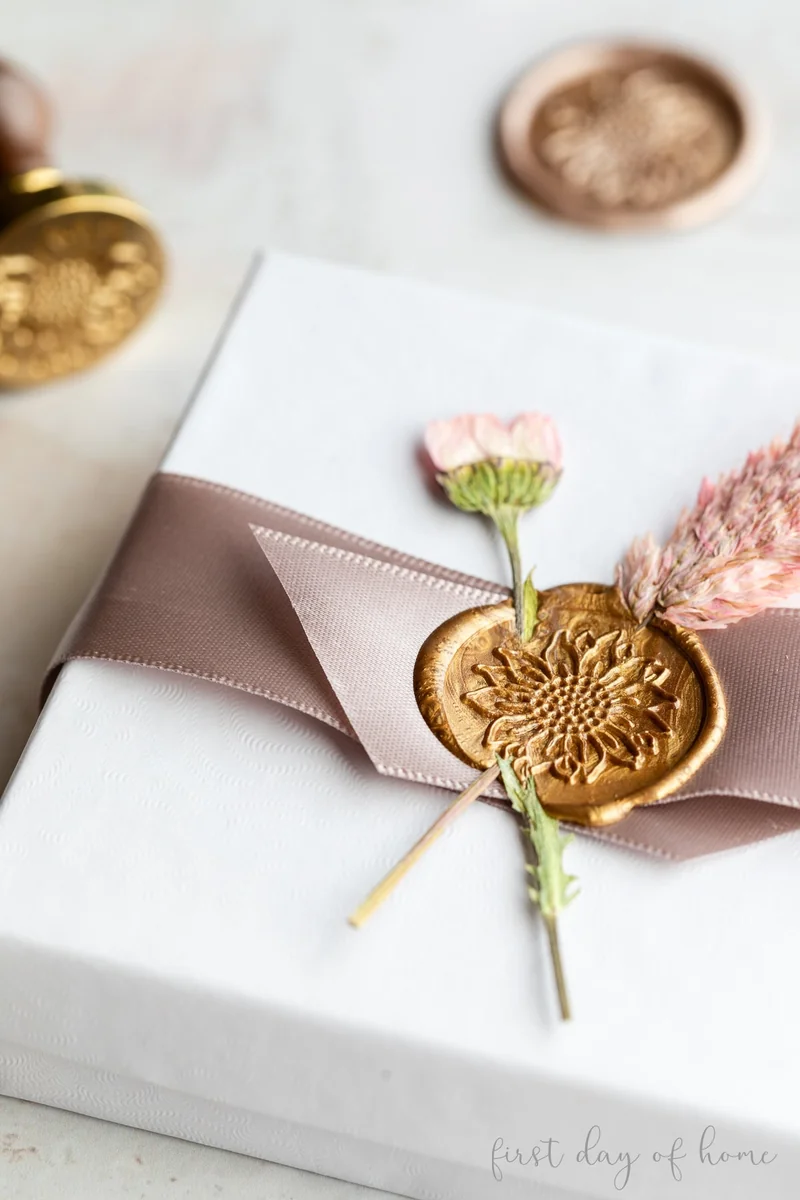
Tutorial: Crissy Baumann, First Day of Home
A wax seal is a finishing mark on a wrapped package, not a substitute for wrapping paper. Crissy Baumann’s First Day of Home tutorial uses a wax-seal kit with a heat gun, a stamp, and wax sticks, pressed onto a ribbon crossing or used to hold a small cluster of pressed flowers in place. She also shows how a pre-made seal can be stuck to a tag or envelope once it has cooled.
Start with a simple box and a ribbon or paper band that will not shift while the wax is soft. Melted wax and a heat gun will burn skin; work on a protected surface, keep the tool away from children and pets, and let the stamp sit until the wax has set before you lift it. A paid pillow-box pattern on her site is not copied here.
What you need: A wrapped gift, ribbon, sealing wax, a stamp, and a heat gun or other melting method from the original tutorial.
Safety note: Hot wax and heat tools burn. This is an adult step. Keep finished seals out of very hot sun if they will sit under a tree near a window.
6. Drop-Cloth Wine Gift Bags
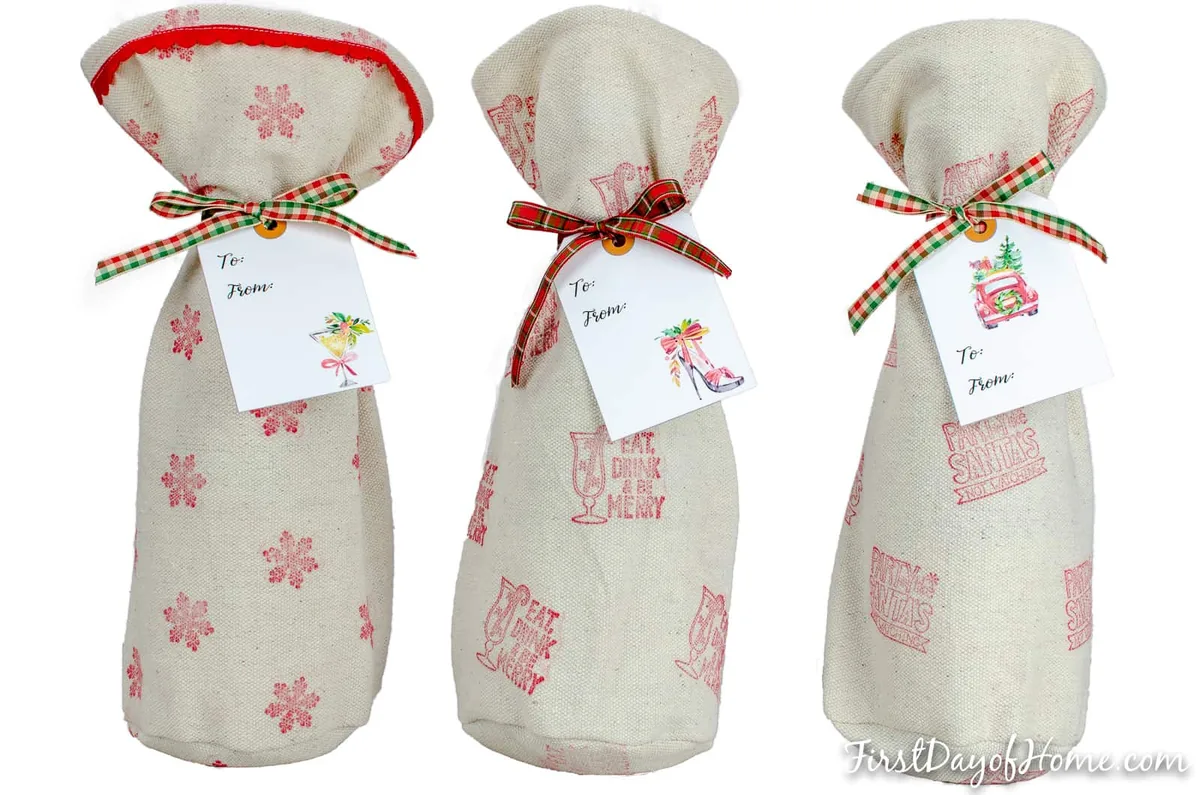
Tutorial: Crissy Baumann, First Day of Home
These are tall, bottle-shaped fabric bags sewn from drop-cloth or similar canvas, not the rectangular drawstring bags later in this list. Crissy’s tutorial walks through a simple sewing pattern for a wine bag, then finishes the neck with ribbon and a tag. Use her pattern from the original post, and do not copy or republish it.
What you need: Drop-cloth or other sturdy fabric, a sewing machine, thread, scissors, ribbon, and a gift tag. Stamping or other surface decoration is optional, as shown.
Safety note: A sewing machine, pins, and needles are adult or supervised tools. A glass bottle inside the bag can break if it is dropped; stand the finished bag where it cannot tip easily.
7. Hexie Fabric Gift Tags
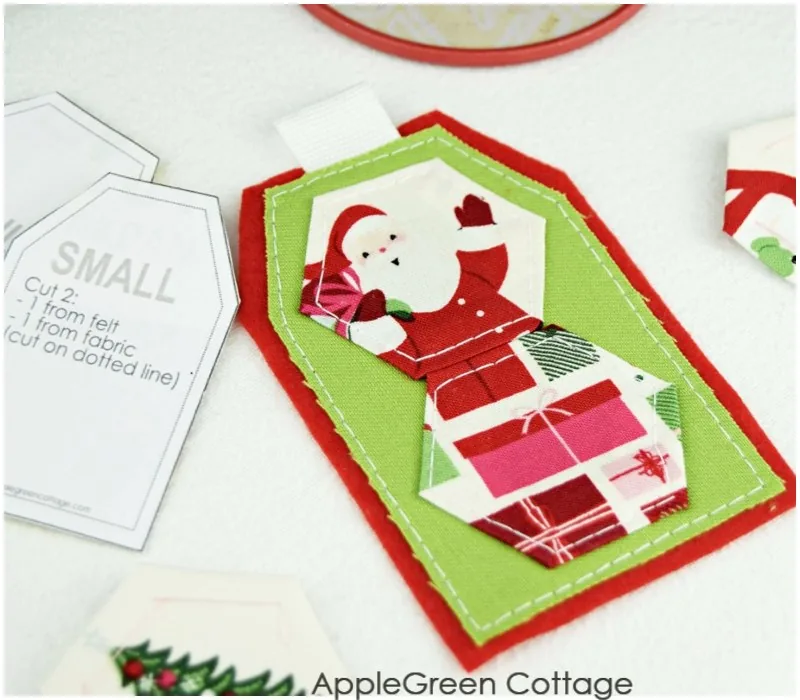
Tutorial: Damjana Jakos, AppleGreen Cottage
A hexie tag is a felt-backed fabric tag with English paper-pieced hexagons stitched to the front, not a flat printed label and not the appliqué tag later in this list. Damjana’s tutorial layers a fabric front over a slightly larger felt back, adds a ribbon loop, and attaches one or two hexies. A free tag template is linked from the original post; use it there, and do not copy or rehost the file.
What you need: Fabric scraps, felt, a short ribbon loop, thread, a needle or sewing machine, and the author’s template. English paper-piecing papers or hexie templates are also used on the original post.
Display tip: Leave the felt back plain so there is a place to write a name, then tie the loop onto twine or a bag drawstring.
8. Sewn Drawstring Fabric Gift Bags
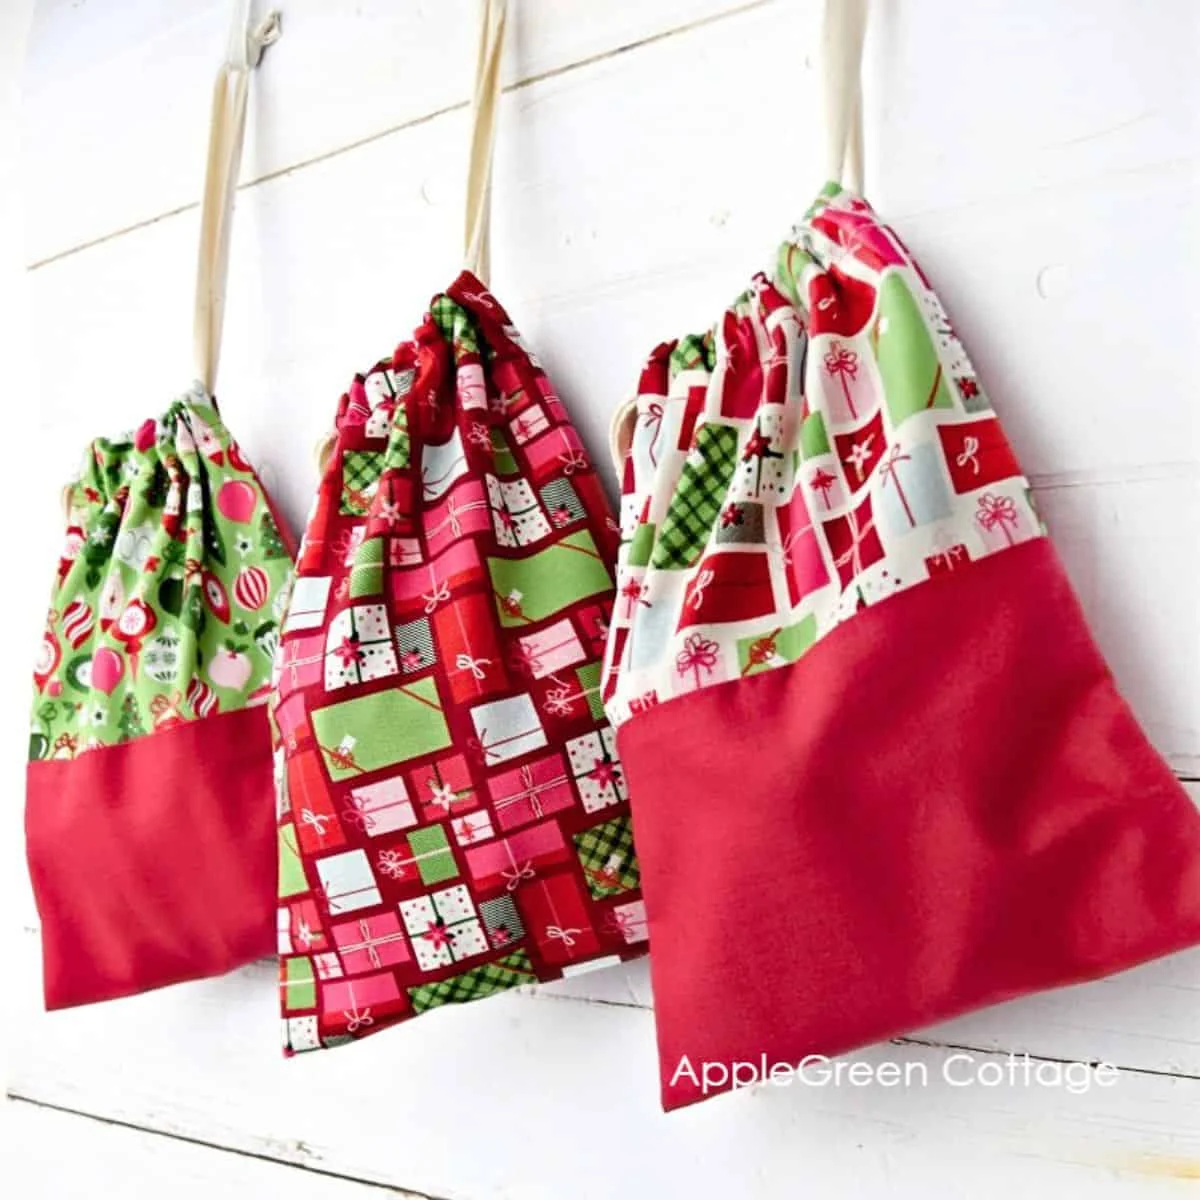
Tutorial: Damjana Jakos, AppleGreen Cottage
A sewn drawstring bag is a reusable rectangular pouch, not a bottle bag and not a knotted cloth wrap. Damjana Jakos’s AppleGreen Cottage tutorial starts with a single rectangle of fabric, finishes the edges, sews the sides, and forms a casing for two cords or ribbons. Her original post includes a cutting chart for several finished sizes, plus an optional color-block version pieced from smaller scraps. Use the chart there, and do not republish it.
A tightly woven cotton holds the seams and the casing better than a loose, stretchy knit. Thread the two cords with a safety pin or bodkin, and knot the ends so they cannot slip back into the casing. A paper tag can be tied onto the drawstring instead of taped to the cloth.
What you need: Fabric, a sewing machine, scissors or a rotary cutter, and twine, ribbon, or cord for the drawstrings. A size chart is on the original post.
Safety note: A sewing machine, pins, and needles are adult or supervised tools. Keep loose cords away from very young children.
9. Felt Loop Bows for Packages
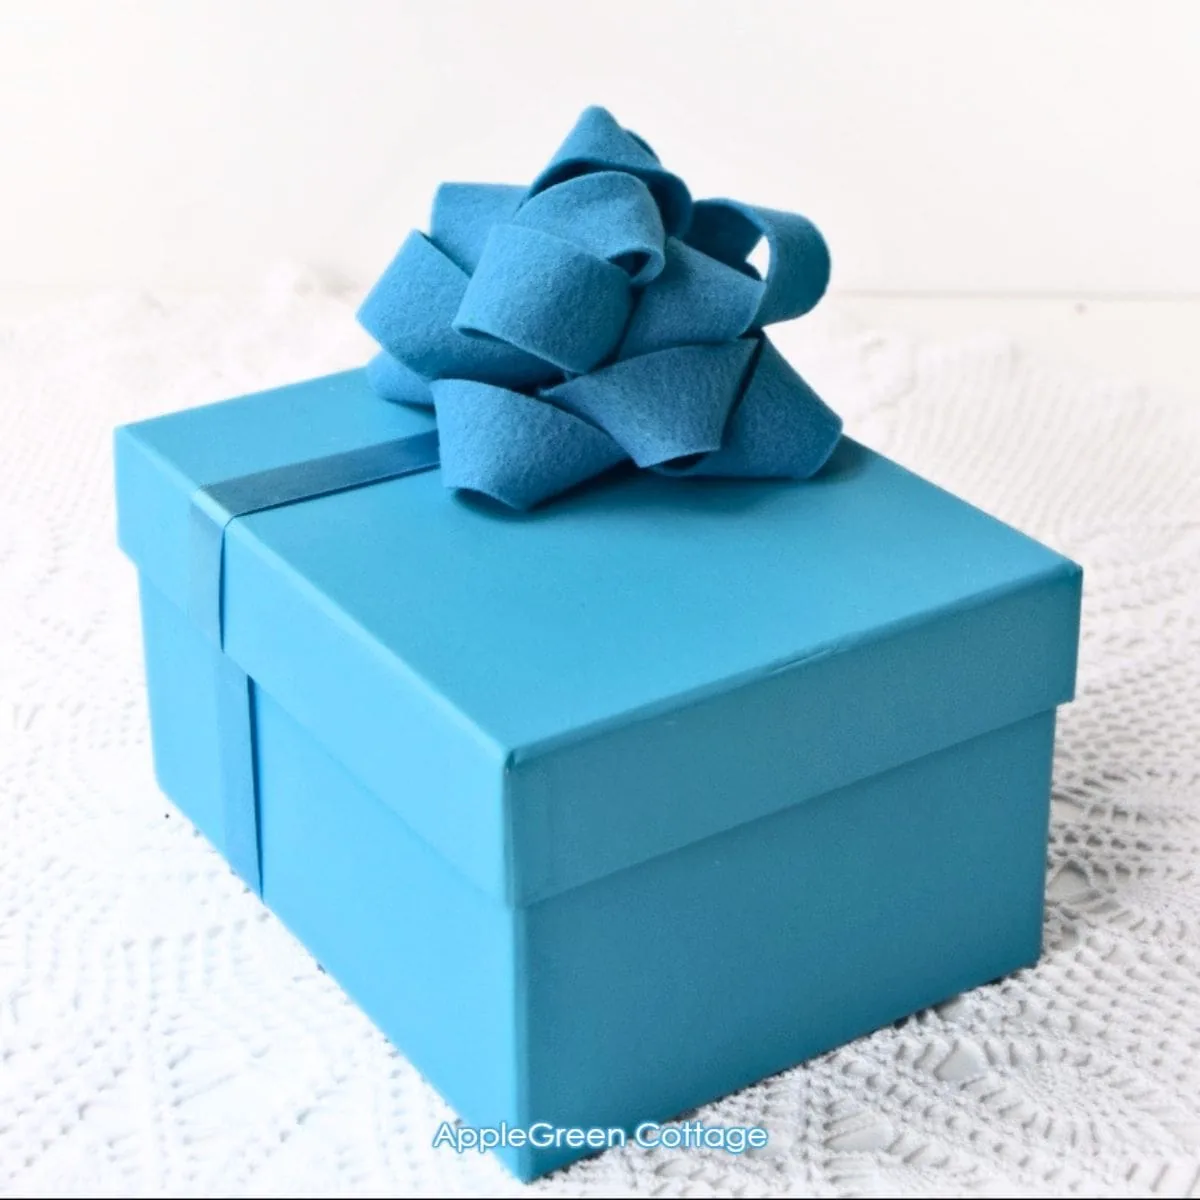
Tutorial: Damjana Jakos, AppleGreen Cottage
This bow is stacked, twisted loops of felt, not a paper scrap bow and not a store sticky bow. Damjana’s tutorial cuts felt into strips, twists each strip into a loop, and sews the loops together from largest to smallest, with a short strip to finish the center. In the photo, the finished bow sits on a boxed gift with a felt band.
What you need: Felt, scissors, a needle, and thread. Double-sided tape can hold the finished bow on a package, as noted in the original tutorial.
Safety note: A needle and scissors belong in adult or supervised hands. Keep the finished bow attached firmly so it is not pulled off as a toy.
10. Appliqué Christmas Fabric Gift Tags
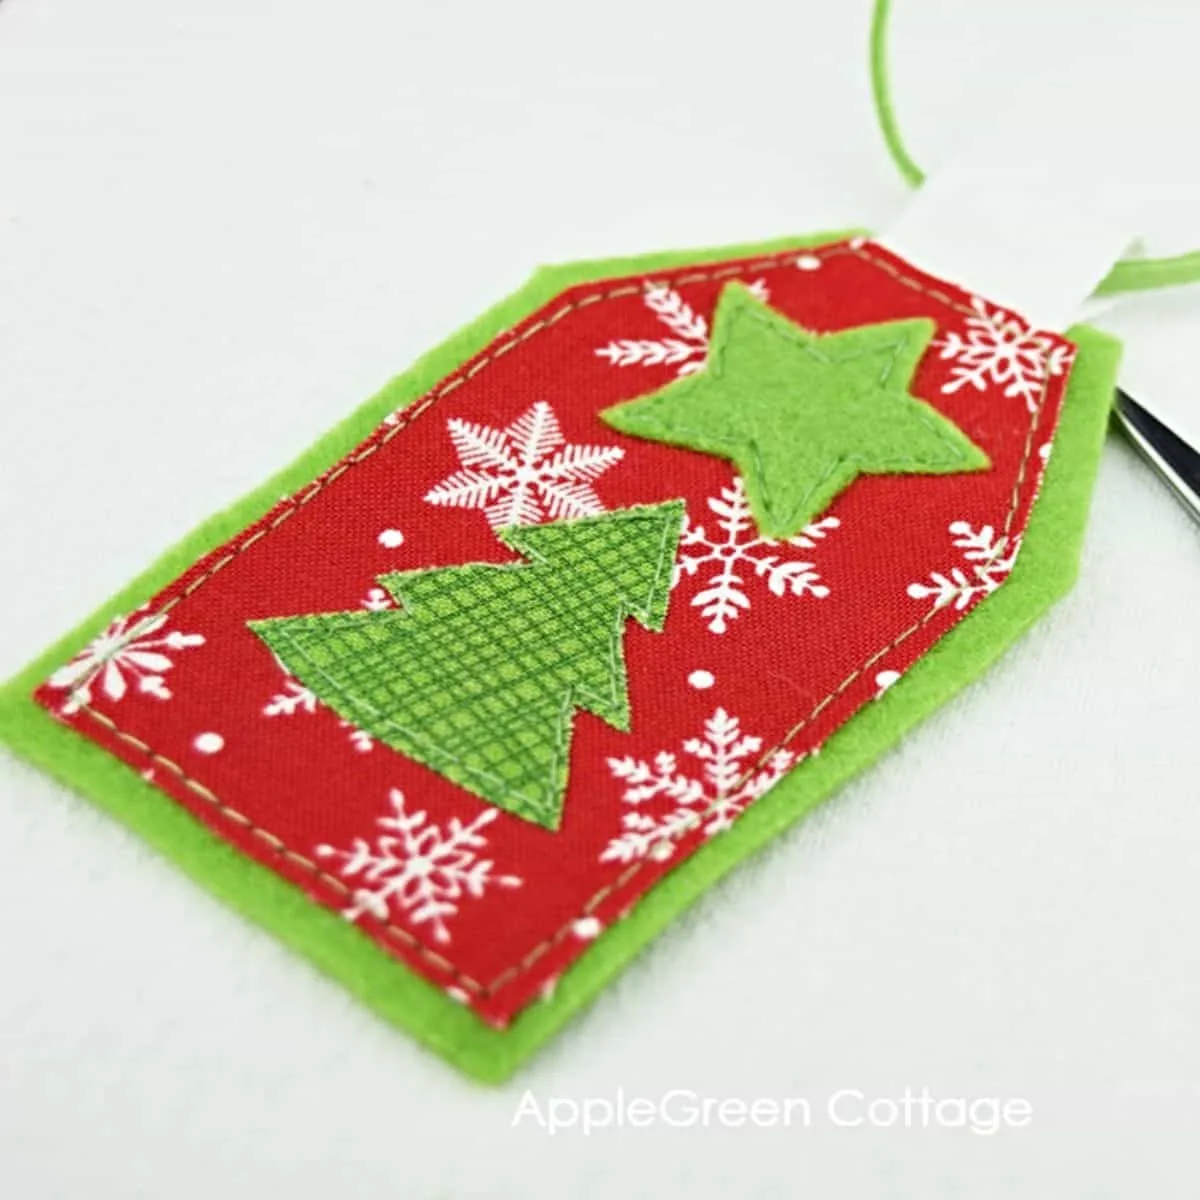
Tutorial: Damjana Jakos, AppleGreen Cottage
These tags use fusible or stitched fabric shapes — a tree, a star, a stocking, a candy cane — on a fabric front, then a felt back and a ribbon loop. They are a different structure from the hexie tags above: the decoration is cut appliqué, not paper-pieced hexagons. A free template from the original post stays on that page and is not copied here.
What you need: Fabric scraps, felt, about two inches of ribbon, thread, scissors, and a sewing machine or needle. Optional fusible web and an iron are used in the tutorial to attach the shapes.
Safety note: An iron and a sewing machine are adult tools. Let the fusible web cool before you handle the tag.
11. Tissue Carnation Package Toppers
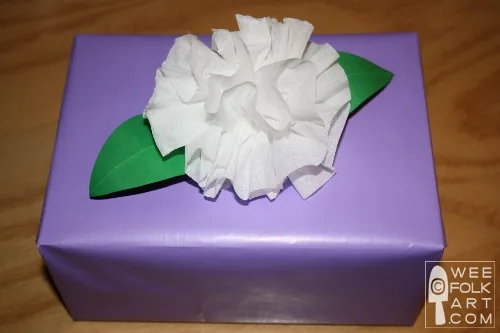
Tutorial: Kimara, Wee Folk Art
This topper is an accordion-folded tissue or Kleenex flower with two paper leaves, glued or taped onto a wrapped box. It is a soft tissue bloom, not a grocery-bag paper flower and not a felt bow. Kimara’s Wee Folk Art tutorial was written for a Mother’s Day gift; it folds, ties, and fluffs the tissue, then curls simple card-stock leaves before they go on the package. The photo is that same purple wrap, not a Christmas-styled shoot. For a Christmas package, the same method can be used with red or white tissue, or a wrap that matches the gift.
What you need: A few plies of tissue or Kleenex, thread or string, green card stock or construction paper, scissors, craft glue or tape, and a wrapped gift.
Make it yours: Colored tissue works as well as white. Place the flower so it covers the folded ends of the leaves, as the original tutorial shows.
Eleven ideas are enough to get a stack of gifts under the tree without buying a matching set of paper, bows, and tags. Start with the wrap the gift actually needs — a kraft sheet, a folded paper bag, or a sewn cloth bag — then add a tag or topper from leftover fabric, felt, tissue, buttons, or last year’s greenery cuttings.
Each full how-to, including any free pattern or template, lives on the original tutorial linked above. Use those pages for the steps, and keep heat tools, irons, glue guns, pruners, and needles in adult hands.